Setting Up Multi-WAN
Jul 13, 2016
Multi-WAN manages your traffic over multiple WAN interfaces, routes individual sessions over the least busy WAN interface and that session continues to use the same WAN until terminated.
This guide assumes that you already have your interfaces and other settings configured correctly, as it will only cover the Multi-WAN specific setup steps.
SSH to your OpenWRT device
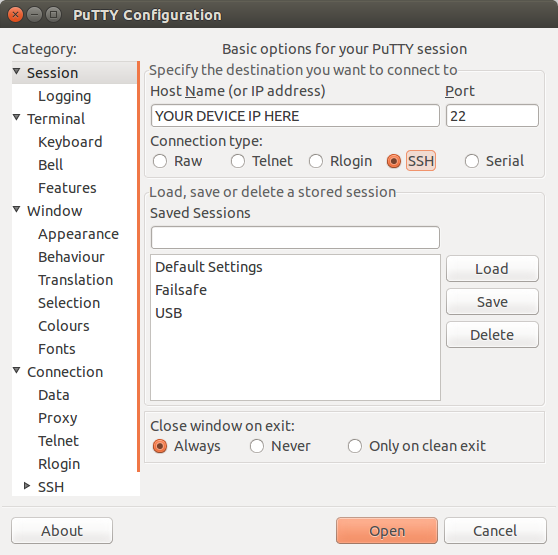
If you are using Windows then start PuTTY and click Session on the left side, select SSH from the options, and then enter in the IP Address of your OpenWRT box into the Host Name field.
Once you’ve done this just click on Open to start up the SSH connection.
If you are connecting via terminal, then just SSH to your OpenWRT device using the following command, where 192.168.1.1 is your OpenWRT device’s IP address.
Installing Packages
First up we need to download the multiwan package that is going to help us configure this.
Run the following commands:
opkg update
opkg install multiwan
Now we need to enable multiwan, so run the following commands:
/etc/init.d/multiwan enable
/etc/init.d/multiwan start
/etc/init.d/multiwan single
Configuration
Now we need to make some changes to the multiwan configuration, so run the following to edit it’s config file:
vi /etc/config/multiwan
Change/add the following to the configuration:
config 'multiwan' 'config'
        option 'default_route' 'balancer'
Once this is done, restart the multiwan process by running the following:
/etc/init.d/multiwan restart
WAN Interfaces
Now edit the same config file again and change/add the following lines, making sure to tweak to your specific needs:
config 'interface' 'wan'
        option 'weight' '10'
        option 'health_interval' '10'
        option 'icmp_hosts' 'dns'
        option 'timeout' '3'
        option 'health_fail_retries' '3'
        option 'health_recovery_retries' '5'
        option 'failover_to' 'wan2'
        option 'dns' 'auto'
config 'interface' 'wan2'
        option 'weight' '10'
        option 'health_interval' '10'
        option 'icmp_hosts' 'dns'
        option 'timeout' '3'
        option 'health_fail_retries' '3'
        option 'health_recovery_retries' '5'
        option 'failover_to' 'balancer'
        option 'dns' 'auto'
Once again, restart the multiwan process by running the following once you are done:
/etc/init.d/multiwan restart
Outbound Rules
For setting outbound traffic rules you will need to change/add the follow to the same config file, changing the variables as you need:
config 'mwanfw'
	option 'src' '192.168.1.0/24'
	option 'proto' 'udp'
	option 'ports' '21'
	option 'wanrule' 'wan'
Then again, restart the multiwan process by running the following once you are done:
/etc/init.d/multiwan restart
Multiwan Setup
The next steps will outline creating your multiwan setup.
Create VLAN
First off we need to define a vlan for WAN2, so run the following command:
vconfig add eth0 2
Configure VLANs and Network Interfaces
Run the following command to open the network config file:
vi /etc/config/network
We need to move LAN port 0 from default eth0_0 to eth0_2, and Configure WAN and WAN2 proto as dhcp.
Multiwan’s documentation provides us with the following example network config setup to follow.
Please note that port numbers can vary between device, so double check what they are for your specific device.
# The following assumes a six port switch, the default WAN port is switch port 0,
# the default LAN ports (1-4) are switch ports (1-4) and the internal switch port
# connection to the router mainboard is switch port 5.

# Although a common configuration, some routers are configured with a 5 port switch,
# a separate physical network interface for the WAN port and the numbering system
# may be different.
config 'switch' 'eth0'
        option 'enable' '1'
# Note: The internal switch port 5 is tagged "5t" in the following configuration
# to allow it to be shared by multiple VLANs (eth0.0., eth0.1, eth0.2)
# Configure 3 external LAN ports on VLAN0.
config 'switch_vlan' 'eth0_0'
        option 'device' 'eth0'
        option 'vlan' '0'
        option 'ports' '2 3 4 5t'
# Configure default WAN port on VLAN1.
config 'switch_vlan' 'eth0_1'
        option 'device' 'eth0'
        option 'vlan' '1'
        option 'ports' '1 5t'
# Configure WAN2 port on VLAN2.
config 'switch_vlan' 'eth0_2'
        option 'device' 'eth0'
        option 'vlan' '2'
        option 'ports' '0 5t'
# Default loopback interface.
config 'interface' 'loopback'
        option 'ifname' 'lo'
        option 'proto' 'static'
        option 'ipaddr' '127.0.0.1'
        option 'netmask' '255.0.0.0'
# Default 'lan' interface configured with Spanning Tree Protocol activated.
config 'interface' 'lan'
        option 'type' 'bridge'
        # On some routers the default 'lan' interface is configured directly
        # to the physical network interface eth0. This has to be changed to
        # a VLAN, in this case eth0.0
        option 'ifname' 'eth0.0'
        option 'proto' 'static'
        option 'stp' '1'
        option 'ipaddr' '192.168.1.1'
        option 'netmask' '255.255.255.0'
# wan interface
config 'interface' 'wan'
        option 'ifname' 'eth0.1'
        option 'proto' 'dhcp'
        option 'dns' '216.146.35.113 216.146.36.113 8.8.8.8 8.8.4.4'
# wan2 interface
config 'interface' 'wan2'
        option 'ifname' 'eth0.2'
        option 'proto' 'dhcp'
        option 'dns' '216.146.35.113 216.146.36.113 8.8.8.8 8.8.4.4'
Configure WAN & Multiwan
Once that is complete, we can now configure WAN and Multiwan to work together. The easiest way to do this is via the LuCi interface. For the WAN setup we need to do the following:
Head into Network > Interfaces > WAN/WAN2 and add WAN2 to the WAN firewall zone.
For Multiwan, we need to carry out these steps:
- Head into Network > Multiwan and tweak the following:
- You can remove any unused WAN interfaces here
- Set load balancer distribution to your desired levels
- Set failover to LoadBalancer
Save all of your changes and give your device one last reboot.
Everything should be configured now, so give your device a test to make sure everything is working.
CT WiFi is a cloud based WiFi management platform for businesses. The firmware gives consumer-grade WiFi access points enterprise-like capabilities. Or you can utilise the captive portal solution with your existing infrastructure. Create a free account and check it here ct-networks.io