Adding a Second SSID
Mar 2, 2016
This guide will show you how to set up a second (and in turn multiple) SSID for your network.
In this example we will be creating an SSID for guest access, separate from your own private SSID.
SSH to your OpenWRT device
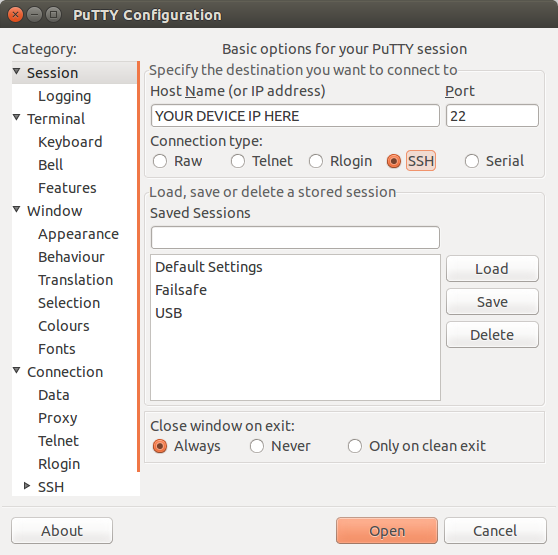
If you are using Windows then start PuTTY and click Session on the left side, select SSH from the options, and then enter in the IP Address of your OpenWRT box into the Host Name field.
Once you’ve done this just click on Open to start up the SSH connection.
If you are connecting via terminal, then just SSH to your OpenWRT device using the following command, where 192.168.1.1 is your OpenWRT device’s IP address.
Create a new network interface
First we need to define a new interface in our network config, so run the following command:
vi /etc/config/network
Now that you have the network config file open, we can add in the following new interface which we are going to name ‘public’.
config 'interface' 'public'
        option 'proto' 'static'
        option 'ipaddr' '10.0.0.1'
        option 'netmask' '255.255.255.0'
Create a new network
Next up we want to create the new guest network/SSID. Run the following command:
vi /etc/config/wireless
Now you can simply copy and paste the existing ‘wifi-iface’ section and change a couple things.
option ‘device’ — Change this to the name of the radio you want to broadcast this network.
option ‘network’ — Change this to the name of the interface you created previously.
option ‘ssid’ — Change to the name you want guests to see when looking for your network.
option ‘isolate’ 1 — add this to the config to prevent clients on the network from connecting to each other.
You should end up with something like the following:
config 'wifi-iface'
        option 'device'     'wifi0'
        option 'mode'       'ap'
        option 'network'    'public'
        option 'ssid'       'Guest_WiFi'
        option 'encryption' 'none'
        option 'isolate'    1
Define a new DHCP pool
If you want DHCP on your guest network, then we will need to make a couple additions to the DHCP config.
Run the following command:
vi /etc/config/dhcp
This will open the DHCP config where you will need to add in the following:
config 'dhcp' 'public'
        option 'interface'  'public'
        option 'start'      '50'
        option 'limit'      '200'
        option 'leasetime'  '1h'
Set option ‘interface’ to the name of the network interface you created at the start.
Define firewall rules
Now we need to secure the public guest network. So run the following command to open the firewall config:
vi /etc/config/firewall
To err on the side of caution, we want to allow guests to the web via http and https, but do not want them to have access to the LAN or anything else.
Add a new zone section for the ‘public’ interface. We are going to allow SSH, DNS and DHCP to the guests, and allow guests http and https to the outside world. Then we want to block everything else.
config zone
      option name 'public'
      option network 'public'
      option forward 'REJECT'
      option output 'ACCEPT'
      option input 'REJECT'

config forwarding
      option src 'public'
      option dest 'wan'

config rule
      option src 'public'
      option src_port '67-68'
      option dest_port '67-68'
      option proto 'udp'
      option target 'ACCEPT'
      option name 'Allow DHCP request'

config rule
      option src 'public'
      option dest_port '53'
      option proto 'tcpudp'
      option target 'ACCEPT'
      option name 'Allow DNS Queries'

config rule
      option src 'public'
      option dest 'lan'
      option name 'Deny Guest on LAN'
      option proto 'all'
      option target 'DROP'

config rule
      option target 'ACCEPT'
      option src 'public'
      option dest 'wan'
      option name 'Allow Guest on WAN http'
      option proto 'tcp'
      option dest_port '80'

config rule
      option target 'ACCEPT'
      option src 'public'
      option dest 'wan'
      option name 'Allow Guest on WAN https'
      option proto 'tcp'
      option dest_port '443'

config rule
      option src 'public'
      option dest 'wan'
      option name 'Deny Guest on WAN'
      option proto 'all'
      option target 'DROP'
After making all of these changes, you will need to either restart the processes or reboot your box.
To restart the processes run the following commands:
/etc/init.d/dnsmasq restart
/etc/init.d/firewall restart
/etc/init.d/network restart
(Optional) Limit guest broadband connection
If you are running a public connection for users it is advised, but not necessary, to limit their broadband usage to limit abuse of your network. There is a handy package you can install to manage this easily. Run the following command:
opkg install wshaper
Once the package is installed, run the following command:
vi /etc/config/wshaper
Set the network option to the name of the network interface you created at the start, and adjust the downlink and uplink options to the download and upload speed limits you want to apply (in kbit).
config wshaper 'settings'
      option network 'public'
      option downlink '1024'
      option uplink '512'
CT WiFi is a cloud based WiFi management platform for businesses. The firmware gives consumer-grade WiFi access points enterprise-like capabilities. Or you can utilise the captive portal solution with your existing infrastructure. Create a free account and check it here ct-networks.io