IP Table Basics
Sep 28, 2016
IP tables allow you to explicitly define rules to allow or deny types of traffic.
This guide will walk you through some of the basics to get you started.
SSH to your OpenWRT device
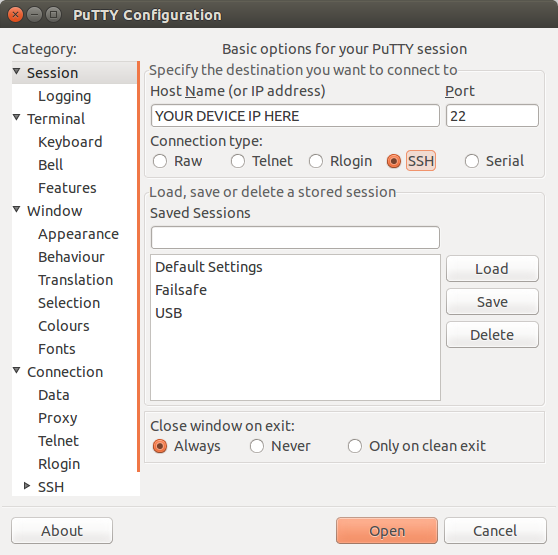
If you are using Windows then start PuTTY and click Session on the left side, select SSH from the options, and then enter in the IP Address of your OpenWRT box into the Host Name field.
Once you’ve done this just click on Open to start up the SSH connection.
If you are connecting via terminal, then just SSH to your OpenWRT device using the following command, where 192.168.1.1 is your OpenWRT device’s IP address.
Installation
iptables typically comes installed by default, however to install it just run the following:
opkg update
opkg install iptables
Default Usage
iptables uses three types of chains to control connections:
- Input: Used to control incoming connections
- Forward: Used to control connections passing through
- Output: Used to control outgoing connections
- And there are three basic responses to these connections:
- Accept: Allows the connection
- Drop: Drops the connection — The source gets no feedback
- Reject: Rejects the connection — The source receives an error
If a connection doesn’t have a matching rule created for it, it will use the default behaviour.
To view what it is set to, run the following:
iptables -L | grep policy
This will output something similar to the following:
Chain INPUT (policy ACCEPT)
Chain FORWARD (policy ACCEPT)
Chain OUTPUT (policy ACCEPT)
You can adjust the default behaviour with the following command:
iptables — policy CHAIN RESPONSE
Simply replace “CHAIN” and “RESPONSE” with the settings you want.
Defining Rules
Once you have your default responses set up, you can continue to define specific rules for specific connections.
If we want to block connections from a specific IP range, we can run the following command:
- iptables -A INPUT -s 108.43.12.0/24 -j DROP
- iptables: Runs the command
- -A: Tells iptables to add this rule to the end of the selected chain
- INPUT: Defines the chain
- -s: Specifies to look out for a source address
- 108.43.12.0/24: Sets the source address you want to apply this rule to
- -j: Specifies to use the following response
- DROP: The response that this rule should apply
Or if you wanted to get even more specific, such as blocking a specific type of connection (such as SSH) from a specific address, we can run the following command:
iptables -A INPUT -p tcp --dport ssh -s 108.43.12.0/24 -j DROP
- iptables: Runs the command
- -A: Tells iptables to add this rule to the end of the selected chain
- INPUT: Defines the chain
- -p: Specifies to look out for a protocol
- tcp: Defines the protocol
- — dport: Specifies to look out for a destination port (this can be any protocol or port number)
- ssh: Defines the destination port
- -s: Specifies to look out for a source address
- 108.43.12.0/24: Sets the source address you want to apply this rule to
- -j: Specifies to use the following response
- DROP: The response that this rule should apply
iptables can get pretty complex pretty quickly, but this covers the very basic usage of it.
Saving
By default iptables can be cleared when the process restarts (such as with a reboot).
To ensure you do not have to keep redefining your iptables, run the following to save them:
/etc/init.d/iptables save
CT WiFi is a cloud based WiFi management platform for businesses. The firmware gives consumer-grade WiFi access points enterprise-like capabilities. Or you can utilise the captive portal solution with your existing infrastructure. Create a free account and check it here ct-networks.io