Setting Up CoovaChilli
Sep 14, 2016
CoovaChilli is a handy package that allows you to set up a captive portal splash page on your LEDE/OpenWRT device.
This guide assumes you already have a RADIUS set up, or are using a splash page provider, with the details needed.
SSH to your OpenWRT device
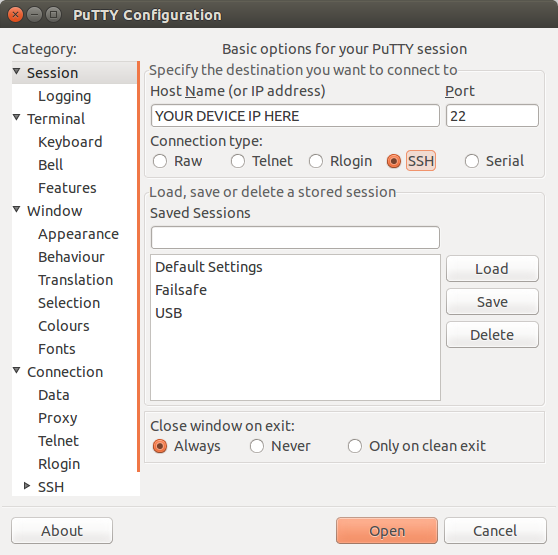
If you are using Windows then start PuTTY and click Session on the left side, select SSH from the options, and then enter in the IP Address of your OpenWRT box into the Host Name field.
Once you’ve done this just click on Open to start up the SSH connection.
If you are connecting via terminal, then just SSH to your OpenWRT device using the following command, where 192.168.1.1 is your OpenWRT device’s IP address.
Installation
Installation is as simple as running the following two commands:
opkg update
opkg install coova-chilli
Configuration
Before making changes to your config, it’s safest to stop Chilli for now. Run the following:
/etc/init.d/chilli stop /etc/init.d/chilli disable
Next we need to actually make some changes to the configuration. To do this, run the following command:
vi /etc/config/chilli
You will need to edit the config file using your details:
config chilli
# option disabled 1
# RADIUS account details
option radiusnasid   "xxxxxxxxx"
option radiussecret  "xxxxxxxxx"
option uamsecret  "xxxxxxxxx"
# WISPr settings
option locationname   "<human readible location name>"
option radiuslocationname  "<SSID>,<sub-ID>"
option radiuslocationid  "isocc=<cc>,cc=<idd>,ac=<ac>,network=<SSID>"
# Radius parameters
option radiusserver1  radius.domain.com
option radiusserver2  radius2.domain.com
# LAN interface to put the hotspot
option dhcpif    br-lan
# DNS
option dns1   8.8.8.8
option dns2   8.8.4.4
# Tunnel and Subnet
option tundev    'tun0'
option net   192.168.180.0/22
option uamlisten  192.168.182.1
option lease   86400
option leaseplus  600
# UAM parameters
option uamserver  "https://domain.com/directory/file.php"
option uamuiport   4990
option uamanydns  1
#option uamaliasip   1.0.0.1
option uamaliasname   login
#option uamlogoutip   1.0.0.0
option nouamsuccess  1
# Hosts walled garden
option uamallowed "host.com"
# Domains walled garden
option uamdomain ".domain1.com,.domain2.com"
# Debug
option swapoctets  1
option interval   3600
# Chilli firewall rules
option ipup '/etc/chilli/up.sh'
option ipdown '/etc/chilli/down.sh'
Next confirm that the interface defined under Tunnel and Subnet in the config is up:
ifconfig
Finally, to confirm that everything is working, connect to your hotspot.
CT WiFi is a cloud based WiFi management platform for businesses. The firmware gives consumer-grade WiFi access points enterprise-like capabilities. Or you can utilise the captive portal solution with your existing infrastructure. Create a free account and check it here ct-networks.io