Configuring VLANs
Mar 9, 2016
There are many ways in which you can make use of VLANs in OpenWRT, from whether you want to separate data from VOIP traffic, to separating guest from private traffic.
In this example we are going to create two separate VLANs; on eth1.1 and eth1.2
SSH to your OpenWRT device
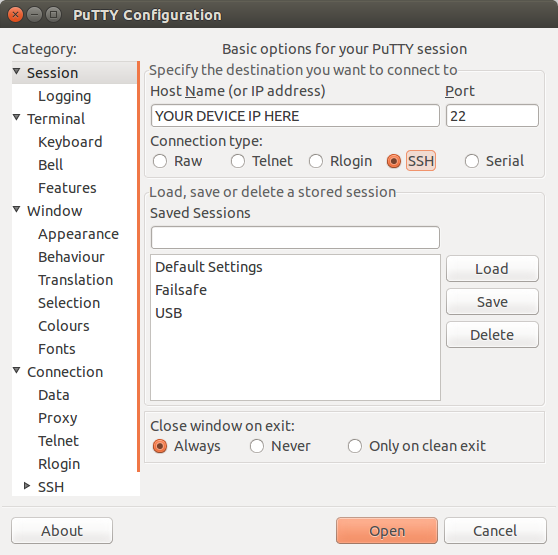
If you are using Windows then start PuTTY and click Session on the left side, select SSH from the options, and then enter in the IP Address of your OpenWRT box into the Host Name field.
Once you’ve done this just click on Open to start up the SSH connection.
If you are connecting via terminal, then just SSH to your OpenWRT device using the following command, where 192.168.1.1 is your OpenWRT device’s IP address.
Create your VLAN interfaces
To start creating your VLANs we will need to make changes to the network config file. So run the following command:
vi /etc/config/network
We need to create a second interface, and assign both of them to the separate VLAN names. So first change the option ifname ‘eth1’ under the original lan interface to ‘eth1.1’.
Now you can copy and paste the lan interface. Then change the option ifname ‘eth1.1’ to ‘eth1.2’ and change option ipaddr ‘192.168.1.1’ to ‘192.168.2.1’ or another suitable range.
Once you have done this, it should look something like the following:
config interface 'loopback'
        option ifname       'lo'
        option proto        'static'
        option ipaddr       '127.0.0.1'
        option netmask      '255.0.0.0'
config interface 'lan'
        option ifname       'eth1.1'
        option type         'bridge'
        option proto        'static'
        option ipaddr       '192.168.1.1'
        option netmask      '255.255.255.0'

config interface 'lan2'
        option ifname       'eth1.2'
        option type         'bridge'
        option proto        'static'
        option ipaddr       '192.168.2.1'
        option netmask      '255.255.255.0'

config interface 'wan'
        option ifname       'eth0'
        option proto        'dhcp'
config switch
        option name         'switch0'
        option reset        '1'
        option enable_vlan  '1'
Assigning to your switch ports
Now that the interfaces have been created, we need to assign them to the switch ports on your router.
The switch port numbers do not always match up to how they are labeled externally, so you will need to confirm this depending on what device you are using before hand.
We want VLAN1 running on ports 1 & 2, and VLAN2 running on ports 3 & 4, so we will need to set the following in the same file:
config switch_vlan 'eth1_1'
        option device   'switch0'
        option vlan     '1'
        option ports    '1 2 0t'

config switch_vlan      'eth1_2'
        option device   'switch0'
        option vlan     '2'
        option ports    '3 4 0t'
As both of these communicate to port 0, this port is tagged (ot).
Firewall & DHCP Configuration
We will now need to add in new firewall rules for the new interface we created (lan2). So run the following:
vi /etc/config/firewall
Add the following into the firewall config:
config zone
      option name       lan2
      option network    'lan2'
      option input      ACCEPT
      option output     ACCEPT
      option forward    REJECT
Now we need to add an entry into the DHCP config file, so run the following:
vi /etc/config/dhcp
Add the following into your DHCP config:
config dhcp lan2
      option interface  lan2
      option start      200
      option limit      250
      option leasetime  24h
Now simply restart your network by running the below command:
/etc/init.d/network restart
CT WiFi is a cloud based WiFi management platform for businesses. The firmware gives consumer-grade WiFi access points enterprise-like capabilities. Or you can utilise the captive portal solution with your existing infrastructure. Create a free account and check it here ct-networks.io